These game day snacks are guaranteed to be fan favorites.
Some people get really into the Super Bowl, especially if their team is playing. Some people are just there to watch the ads, while others are most excited about the snacks they’ll get to eat during the Super Bowl party. If you fall into that last group, you’ve probably done some thinking about what Super Bowl snacks you’ll be preparing this year. These are some of the best Super Bowl recipes that will make game day a win this year, regardless of which team actually takes home the trophy.
There’s something in here for everyone, whether you’re serving a crowd of meat lovers, vegetarians, picky eaters, chocoholics, kids, or even all of the above. Win or lose, these Super Bowl snacks are sure to please any crowd when it’s time to gather around for the game.
Ham and Brie Quesadilla
Quesadillas are a Super Bowl staple, but this version takes them to the next level with ham, brie, and Dijon mustard.
Spicy Deviled Eggs
Add a special twist to deviled eggs on game day with hot sauce and leftover ham. There won’t be any of these left by halftime.
Pulled Pork Sliders with Romaine Slaw
These pulled pork sliders get a sweet-and-sour upgrade thanks to the orange marmalade and cider vinegar in this recipe. Most of it comes together in a slow cooker, leaving your oven and stovetop free for other game day goodies.
Warm Pimiento Cheese Dip
Pair your favorite crunchy snack with this cheesy, peppery dip for a snack your guests won’t be able to stay away from.
Eggplant Parmesan Meatballs
This vegetarian take on the classic party snack will make even the biggest meat-lovers want seconds.
Best Ever Chocolate Chip Cookies
For a sweeter Super Bowl snack, you can’t go wrong with this classic recipe for crisp, chewy chocolate chip cookies.
Article by Christy Pina, Katina Beniaris and Jamie Ballard for Woman’s Day
Unwrapping presents may be the main event on Christmas morning. But a delicious brunch—best enjoyed in PJs—also brings merriment to the morning. Whether you like sweet (extra syrup, please!) or savory (ham and cheese are a dream team), here are 17 brunch recipes that feel just right for Christmas morning.
Your muffin tins are multi-taskers. Not only can they bake your favorite muffins, but they can also make individual quiches to wow your brunch crowd. This recipe is especially great for Christmas morning because you can dice up some leftover ham from a Christmas Eve dinner, then mix in the vegetables. A generous serving of Gouda gives them a creamy, buttery bite.
For a delicious brunch, bake this flavor-packed and filling breakfast casserole that’s made with caramelized onions, baby kale, and mushrooms.
7. Charcuterie Brunch Boards
Here’s a genius idea: Make a charcuterie board for brunch on Christmas morning so that your family can wander in and out of the kitchen, enjoying a completely customizable and leisurely breakfast.
Easy-to-assemble, a charcuterie board is a perfect place for your favorite brunch staples. The possibilities are endless, but you can start with cheeses, hard-boiled eggs, sliced ham, waffles, fruit, vegetables, and more.
Speaking of more, to see more brunch idea’s, copy and paste the link below:
17 Christmas Brunch Recipes for a Festive Holiday — Eat This Not That
MIKE GARTEN. FOOD STYLING: CHRISTINE ALBANO. PROP STYLING ALEX MATA
What is charcuterie?
Those pretty meat and cheese boards you see all over social media are a trend that actually originated with meat spreads in 15th-century France. The definition of charcuterie is “the culinary art of preparing meat products,” according to The Organic Kitchen. Charcuterie was actually developed out of necessity — it’s the way meats were preserved long before refrigeration came about.
How is charcuterie pronounced?
Pronounced shahr-ku-tuh-ree, the word “charcuterie” is French for “pork butcher shop.” The more you know!
Charcuterie boards are trending online and on social media, and for good reason: They’re pleasing to look at and even more satisfying to eat. As a party appetizer option, meat and cheese boards are extremely versatile. (For vegetarians and vegans, charcuterie boards these days don’t necessarily have to include meat or cheese, FYI.)
What makes charcuterie boards so ideal is that they can be completely customized for any occasion or celebration, big or small, and you can put virtually anything on one. Here, you’ll find answers to all your charcuterie questions, plus tons of unique charcuterie board ideas for you to try out the next time you host — from festive platters that will feed a crowd at Christmas, to simple spreads for two that make the perfect starter for a romantic date night dinner.
Craving even more inspiration? Check out our picks for where to buy the best charcuterie boards and serving accessories online, plus Instagram accounts to follow for step-by-step tutorials, fresh ideas, and pictures that will have you making heart eyes for days. What are you waiting for? Let’s get into it.
YIELDS:8 – 10 servings PREP TIME: 30 mins TOTAL TIME: 30 mins
INGREDIENTS:
8 oz. Gruyère cheese, sliced
8 oz. Roquefort cheese, sliced
1/4 lb. sliced mortadella
1/4 lb. sliced Genoa salami
1/4 lb. thinly sliced prosciutto
1 apple, thinly sliced
4 oz. caramelized pecans
1 package thin breadsticks
1 bunch Concord grapes
1/2 c. Castelvetrano olives
1 recipe marinated mushrooms
1 recipe spinach-artichoke dip
Dried mangoes
Dried cherries
Dried peaches
Dried plums
8 oz. feta cheese
Garlic chile oil, for drizzling over feta
6 oz. Gouda, sliced
1/4 lb. soppressata, sliced
1 bunch Champagne grapes
1 package Lesley Stowe Raincoast Crisps Cranberry and Hazelnut Crackers
4 oz. Fig spread
6 oz. manchego cheese, sliced
1 package Everything crackers
DIRECTIONS:
Arrange cheeses on 3-4 medium-sized serving boards.
Set out small dishes for olives, marinated mushrooms, spinach-artichoke dip, spicy feta, and fig jam.
Arrange meats alongside cheeses, folding some slices and fanning out others.
Fill in the empty spaces on and around your boards with fresh and dried fruit, pecans, breadsticks, and crackers.
Don’t forget to set out toothpicks, serving spoons, and cheese knives for guests to serve themselves.
What should be on a charcuterie platter?
Along with the traditional cured meat, the addition of paired cheeses and accompaniments like fruit, nuts, olives, and spreads are common in restaurants that serve charcuterie boards. Here’s what you’ll find on a traditional charcuterie board:
Cured meat
Cheeses
Olives
Nuts
Fruits and Veggies
Crackers
Jellies and jams
Pro tip: Using a bunch of smaller boards instead of one big one means you can move servings around to feed a crowd.
Brunch Charcuterie Board
Keep the party going in the morning with a next-level brunch! Arrange mini pancakes and waffles, bacon, hard-boiled eggs, sliced avocado, sausage, and fruit on a platter; blueberry sauce and cinnamon maple butter spread (combine 1 stick unsalted butter at room temp with 3 Tbsp maple syrup and 1/4 tsp ground cinnamon) round out the tray.
Article by Jamie Kravitz for Women’s Day. There are more boards to browse at the link below. Copy and paste the link.
Source: How to Make the Perfect Charcuterie Board – Charcuterie Board Ideas (womansday.com)
While we must say we love to use cream cheese when making desserts and often reach for it while baking, we realize there are times when you may prefer a recipe that doesn’t call for a block. Whether you’re having trouble finding cream cheese on the shelves of the supermarket or have family members that don’t particularly love the flavor, there are still plenty of dessert recipes you can make without it. From cakes to cookies to fudge and more, there is a long list of festive dessert recipes that don’t need cream cheese to be delicious. We’ve rounded up 21 of our best Christmas dessert ideas you can make this year without cream cheese.
Red Velvet Cake Crinkle Cookies
These crinkle cookies are rich, cakey, and slightly fudgy—kids will love them and adults will, too. Plus, there’s a surprise here. These treats are coated in a snowy layer of powdered sugar, just like classic crinkle cookies, but inside they’re more like velvety chocolate cake (with white chocolate chips!) than fudgy brownies. To ensure they have a nice deep hue, use gel food coloring rather than liquid. The latter won’t tint the batter as well.
Recipe: Red Velvet Cake Crinkle Cookies | Southern Living
Christmas Fudge
Among the most beloved holiday treats, fudge holds pride of place in gifted Christmas tins and on holiday party dessert tables. Make no mistake, the diversity of fudge flavors is endless, but when it comes to Christmas Fudge, we have the firm belief that simple and classic chocolate fudge is almost always a better choice than anything elaborate and novel. Our recipe makes the most of bittersweet and unsweetened baking chocolate by letting their flavor stand on their own while including a few other ingredients to enhance the richness and the silkiness of the fudge itself. Sweetened condensed milk and butter are used to transform the melted chocolate into a sweetened and milky ganache, while the salt, espresso powder, and vanilla compliment the flavor of the chocolate and make the depths of that flavor more pronounced. The secret ingredient in this recipe is the corn syrup which prevents any crystal formation in the fudge and allows the finished product to be perfectly smooth with a slight chew rather than a crumbly, powdery, and altogether disappointing piece of crystalized fudge. To keep with the theme of simplicity, the decoration for this fudge is a mix of red, green, and white sprinkles that lend a delightful crunchy contrast to the velvety texture of the fudge. Finally, the flake salt called for in the recipe is optional, but when used, it enhances the fudge squares with a subtle saltiness while also adding the visual appeal of flaky crystals—taking something that looks almost like a kid’s treat at Christmas and elevating it to something fun and sophisticated.
Recipe: Christmas Fudge Recipe | Southern Living
Old Fashioned Gingerbread
Nothing makes a house smell more like Christmas than the sweet and spicy aroma of a freshly baked pan of gingerbread. We’re not talking about the crisp cookies or the houses covered in icing and candy. The taste of those holiday delights just can’t compare to a slice of tender, richly spiced gingerbread cake. The practice of baking and sharing gingerbread originated in Europe several hundred years ago and then made its way to the colonial South as families immigrated to the region and brought their recipes and traditions with them. Ginger from Asia and dried spices such as cinnamon, nutmeg, mace, allspice, and cloves arrived by ship into Southern ports and traveled inland because they were easy to transport and store. Whole dried spices kept well and retained their flavor and aroma for months. When combined with affordable sweeteners (like molasses or honey) and farmstead staples (such as butter and eggs), gingerbread could be made by home bakers when more expensive ingredients were not an option, which is why it became a wildly popular dessert. If you don’t have all the ground spices on hand, you can substitute two teaspoons of pumpkin pie spice along with the black pepper.
Recipe: Old Fashioned Gingerbread Recipe | Southern Living
This Christmas charcuterie board is one of my favorite Christmas food boards! It’s a dessert charcuterie board full of cookies, candy, and other seasonal treats! Make this Christmas candy charcuterie board for your next holiday gathering!
WHAT IS A CHRISTMAS CHARCUTERIE?
This is it! Day 12 of my 12 Days of Christmas Cookies series! It’s been so fun sharing some of my favorite Christmas Cookie recipes with you the past 12 days, and don’t worry I’ve got lots more cookie goodness in the works coming up soon! In the meantime, I’ve got just the solution for your holiday snacking needs — this dessert charcuterie board filled with lots of cookies, candies, fruits, and everything salty, tangy, and sweet! It’s the best way to showcase all the holiday treats you’ve been working on this season, and such a fun, festive way to keep your Christmas crew happy!
10 min · 396 cals per serving · 15 servs Read full directions
INGREDIENTS (17)
NUTRITION FACTS
5
Cutout Sugar Cookies
5
Gingerbread Crinkle Cookies
3
Christmas Cookie Cake (slices)
5
Cranberry White Chocolate Shortbread Cookies
8
Cinnamon Palmiers
5
Chocolate-Covered Oreos
4
Peppermint White Chocolate Sugar Cookies
1 cup
Holiday Marshmallows
6
Graham Crackers
4 ounces
White Chocolate Pieces
½ cup
Holiday M & Ms
7
Candy Canes
1 cup
Sugared Cranberries (see note)
2 tablespoons
Jam
¼ cup sprinkles
Nonpareils (and/or sanding sugar)
¼ cup
Frosting
add
Rosemary (or dried citrus, for garnish)
Nutrition
Serving: 1 serving | Calories: 396 kcal | Carbohydrates: 57 g | Protein: 3 g | Fat: 18 g | Saturated Fat: 9 g | Cholesterol: 24 mg | Sodium: 219 mg | Potassium: 35 mg | Fiber: 0.5 g | Sugar: 39 g | Calcium: 20 mg | Iron: 1 mg
My air fryer changed my cooking for the better, but there are some things I wish I knew before buying it.
The air fryer is small, so you can’t cook for many people, and you can’t cook multiple foods at the same time.
I find that you will need a cookbook and olive oil to successfully use an air fryer.
Throughout 2020, I heard many friends and people all over social media raving about their air fryers. When the holidays came around, I decided to finally find out what all the fuss was about. Instantly, I understood why so many people have fallen in love with the kitchen appliance. The air fryer became a game changer in my kitchen, allowing me to cook dinner in minutes and fry chicken, vegetables, and other foods without submerging them in unhealthy oil.
Even though the appliance changed my cooking lifestyle for the better, there were still a few things about the air fryer that surprised me and that I wish I knew before I made the purchase.
There are many different types of air fryers, and the one you choose is important.
There are a ton of air fryers on the market, but they mostly boil down to two models: a convection-oven air fryer and a basket air fryer. The first one resembles a mini toaster or convection oven. On the other hand, the basket air fryer is the more traditional air fryer that uses a drawerlike compartment to cook food.
I was not expecting there to be so many options, so I had to do a lot of research to make sure I was making the right decision. In the end, I decided to buy the Cuisinart convection-oven air fryer for $100 because it has more capabilities, like broiling, toasting, and roasting.
Air fryers can take up a lot of counter space.
Though some are small enough to fit in a cabinet, the air fryer I bought could not easily be stored away. Measuring 11.75 inches by 12 inches, my air fryer needed plenty of counter space, to my surprise. When I unboxed the new appliance, I needed to find 2 feet of counter space in my small Brooklyn apartment. Eventually, I found a spot next to my microwave that has become what I call the appliance corner.
Everything cooks so fast — sometimes too fast.
When cooking in an air fryer, most foods take less than 15 minutes to fully cook, which is always a surprise for me. Typically, I’m used to waiting 20 or 30 minutes to bake chicken breasts in the oven. While the chicken breasts bake, I typically wash the kitchen and tidy up.
Sometimes, things cook so fast that I don’t even realize they’re done. One night, I cooked a meatloaf, and it was finished in under 15 minutes. I was expecting it would take closer to 20, so I left it in there too long. That night, I had burned meatloaf for dinner.
You have to flip most foods halfway through the cooking time for an even cook.
In my air fryer, it’s difficult to get an even cooking texture. Most times, the top of the food becomes crispy and delicious, while the bottom remains soggy. For example, when I made breaded chicken cutlets, one side of them was crunchy, while the other looked mushy.
I learned quite quickly that I had to flip the food halfway through to get the underside crispy as well. It’s not something I was used to doing with a regular oven.
Some air fryers come with a basket and a tray, and it’s confusing when you should use which.
My air fryer came with a basket and a tray. Some recipes I’ve used told me to use the tray and others told me to use the basket. When I’m not using a recipe to cook dinner, I often struggle to decide which is best to use — something I never had to struggle with before I had an air fryer. I tend to lean toward the basket when I’m attempting to fry something and the tray when I’m roasting.
Following an air-fryer cookbook — especially in the beginning — is a lifesaver.
Since my air fryer looks so much like an oven, I’ve caught myself using it like one. Instead of following a recipe, there have been a few times where I’ve just thrown food in and set the temperature to 375 degrees. In these incidences, the meal never turns out great because it’s not a typical oven. It’s an air fryer that relies on temperature and timing controls that I’m not familiar with just yet.
When I follow an air-fryer-specific recipe that tells me what to put the temperature on and how long to cook it for, the food always turns out much better.
Many air fryers are best for one to two servings and can’t really be used for big dinners.
Though the air fryer was bigger than I expected, and I struggled to find counter space for it, the space where food is cooked is quite small. I can’t imagine you can cook for a large group of people with this appliance — at least not in the model I own. You’d have to cook in batches.
For instance, some recipes I’ve followed said I should put in only two strips of chicken breasts at a time to ensure even cooking and then do a second batch.
I’d recommend staying away from the air fryer if you’re cooking for more than two people.
Similarly, you can’t cook the meat and the vegetables at the same time.
I’m used to baking chicken and vegetables on one giant sheet in the oven. That’s not possible in an air fryer because of its size.
One night I was cooking chicken, broccoli, and Brussels sprouts, and they all needed to go in the air fryer, according to their recipes. Instead of putting them all on one tray, as I would have with a traditional oven, I had to cook the chicken first, then the vegetables. By the time everything was finished cooking, the meat was cold.
Olive oil is still necessary when cooking with an air fryer.
A common misconception is that air fryers completely eliminate the need for olive oil. The truth is that most recipes I’ve used still want me to drizzle olive oil on my food so that it will crisp up in the air fryer. But it is important to note that I’ve used significantly less olive oil with the air fryer than I would have if I traditionally fried my foods.
When the food is cooking, it’s difficult to check if it’s done.
Though my air fryer has a window, the space inside is so small that it’s difficult to see if something is cooked or not. With basket air fryers, there is no window, so it’s impossible to see how your food is doing. Instead, you have to rely solely on the timer.
Many times I’ve had to open the door, let out the precious heat, and pull out the tray just to see if something is cooked through.
According to Darina Allen, the grande dame of Irish cooking and author of multiple books on the subject, “From earliest times, breadmaking was an integral part of daily life in almost every home…even in the poorest country cabin, fresh soda bread would have been mixed on a wooden baking board and baked on the griddle, or…over the ember of the turf fire.” Those loaves featured Irish wheat and buttermilk—either the by-product of butter making, or in the days before refrigeration, sour milk that needed to be used up. The lactic acid in the buttermilk reacts with the alkali baking soda to create carbon dioxide, which in turn causes the bread to rise. Baking soda was introduced to Ireland (where it’s known as bread soda) in the 1830s. Since then, it’s been a staple in Irish home (and restaurant) kitchens. Incidentally, historians trace the development of baking soda to Native Americans, who first used pearl ash as a way to leaven bread.
One this side of the Atlantic, what we call “Irish soda bread” is more rich and sweet, usually studded with raisins and caraway seeds. These cakey, scone-like loaves often include eggs and butter for tenderness and more flavor. It’s nearly impossible to find an accurate date when it became known as the definitive soda bread in the United States. Nevertheless, it’s been on the menu in Irish restaurants and bars on St. Patrick’s Day and sold in bakeries throughout Irish-American strongholds all year long for as long as anyone can remember. Though its overall shape and structure derive from those early Irish loaves, it bears more of a resemblance to a cake known as Spotted Dog (or Spotted Dick, not to be mistaken for the British steamed pudding of the same name). To further confuse matters, Spotted Dog is known as Railway Cake when it’s baked in a loaf pan. Good luck keeping all those names straight!
If you’re new to bread making, you might want to start with soda bread. Martha’s take on the authentic Irish loaf—with a combination of graham and all-purpose flours filling in for the Irish whole grain, and butter added for richness—and this rye version are both heavenly served with smoked trout, strong cheeses like Cashel blue, warm bowls of hearty soup, or simply slathered with salted Irish butter. From there, you can try one of the sweeter, cakier versions.
The last step in making any loaf of soda bread is to cut a cross in the top of the dome of dough. According to Irish legend, this is to “let the devil out,” but the technique actually serves a practical purpose. The deep slash allows the dough to cook evenly from crust to inner crumb, creating the inimitable texture that American culinary icon James Beard described as “velvety.”
As for the name, the easiest way to clear up the confusion may be to simply refer to the raisin- and caraway-studded version as Irish American Soda Bread. In that most American of American cookbooks, the bread is aptly described as “richer, sweeter and more cake-like than authentic Irish soda bread, which we are assured never made the acquaintance of a raisin or caraway seed either.” Perhaps adding the “American” qualifier between “Irish” and “soda” makes saying it too much of a mouthful.
The one caveat about making soda bread from scratch is that it is best eaten on the day that it’s baked. It doesn’t keep nearly as well as yeast-risen breads. As long as you have enough good-quality butter, some nice fruit jam, and some Irish smoked salmon, however, that shouldn’t be a problem.
At Epcot’s International Festival of the Holidays, parkgoers can walk the World Showcase, sampling foods that are holiday staples in different countries. At each food cart, a menu of savory entrees, sweet desserts and festive beverages are presented, from a pumpkin spice margarita in the Mexico pavilion to pork schnitzel in Bavaria.
But two standout favorites among festival attendees this year are located in Disney’s Canada pavilion: A flavorful beef bourguignon and a maple yule log, both served up at the Yukon Holiday Kitchen food booth.
Disney chef Kevin Downing told TODAY Food both dishes are new to this year’s festival, but that hasn’t stopped them from being a big hit both with Disney’s chefs and park guests.
Beef Bourguignon with Crushed Red-Skinned Potatoes by EPCOT Festival Chefs
“The beef bourguignon is served over crushed red skin potatoes with a hearty gravy over top,” said Downing. “It’s a perfect dish for the days when it’s super cold outside, and a Merlot pairs perfectly with it because you get the big bold flavors of the red wine along with the nice red wine flavor you get from the beef bourguignon — it’s one of my favorite pairings.”
“And our Bûche de Noël has a maple mouse with cranberry wrapped in gingerbread chiffon,” Downing added. “Our bakery team worked really hard to make it festive and like a traditional yule log.”
Maple Bûche de Noël (Yule Log Cake) by EPCOT Festival Pastry Chefs
Disney shared the recipe for its beef bourguignon on the Disney Parks Blog, describing the decadent dish as, fork-tender beef brisket with savory flavors of bacon-infused wine sauce over crushed buttery red potatoes,” and, as someone who tried the dish at Epcot earlier this month, I’d say it nailed the description.
In fact, the entire meal I ate at Yukon Holiday Kitchen was delicious, so I asked Disney Parks to share the recipe for its Maple Bûche de Noël (or yule log) with TODAY, too.
With both recipes and a host of ingredients in tow, I spent my Sunday afternoon in the kitchen, attempting to re-create both dishes.
While my yule log wasn’t as beautiful as Disney’s and resembled something on an episode of “Nailed It,” it tasted as good as the one served at Epcot. Making a yule log, I learned, is a labor of love, with lots of ingredients and steps to check off along the way. But what delicious steps they were: I could have eaten the maple mousse filling by itself, and the gingerbread chiffon was perfectly spiced.
At Downing’s recommendation, we paired our beef bourguignon with a nice Merlot. And he was right: The pairing only heightened the rich flavors of the wine-braised stew.
A visit to Epcot may not be in your future this holiday season, but with this impressive meal from Disney Parks, you can feel festive (and full!) in the comfort of your own home.
Source: Disney’s Epcot beef bourguignon and yule log cake recipes make the perfect holiday dinner (msn.com)
Like building gingerbread houses, cookie decorating is a holiday right of passage. Watching your sugary, snowmen-shaped confections emerge from the oven, ready to be slathered with icing will make your tummy rumble and your mouth salivate. This recipe for royal icing is perfect for decorating your cookies with top hats, carrot noses and more.
The best part about this royal icing is that it dries hard and quickly, allowing you to make a flurry of holiday shapes and customize them as your heart desires. Want to give Rudolph his shiny red nose? The secret is royal icing. This icing is also the ideal thing to hold together gingerbread houses and make whipped snow for them to sit on. Just beware, this icing uses raw egg whites, so it’s not ideal for babies, pregnant women or high-risk individuals.
Southerners are known for having delicious food on their tables, and the holidays are no exception. This appetizer for hominy fritters with homemade bacon thyme dipping sauce is inspired by hush puppies, which are a Southern staple.
HOMINY FRITTERS WITH BACON THYME DIPPING SAUCE
Southerners are known for having delicious food on their tables, and the holidays are no exception. This appetizer for hominy fritters with homemade bacon thyme dipping sauce is inspired by hush puppies, which are a Southern staple.
To make royal icing, you’ll need just 10 minutes of free time and a few common pantry staples: like eggs, confectioners sugar, cream of tartar and vanilla extract. Want to make your holiday cookies very merry? Mix the icing with food coloring to create wonderful shades of red, green and blue, perfect for Santa’s coat and snowy scenes.
Get started by mixing the egg whites, cream of tartar and vanilla on high speed until frothy. Adjust the mixer speed to low and slowly add the confectioners sugar. Return the mixer speed to high and mix the icing until it’s thick and forms glossy, high peaks.
Use royal icing to customize your cookies once they are completely cool. Be sure to cover the icing you aren’t using with plastic wrap so it doesn’t dry up. Got extra time on your hands? Don’t stop the cookie baking extravaganza there, try out more of our best Christmas cookie recipes, from sugar to peppermint swirl.
Royal Icing
Ingredients
4 1/2 cups confectioners sugar
4 pasteurized egg whites
1/2 teaspoon cream of tartar
1 teaspoon vanilla extract
Food coloring, if desired
Directions
In a large metal bowl of an electric mixer, use the whisk attachment to beat the egg whites, cream of tartar and vanilla on high speed until frothy.
Adjust mixer speed to low. Slowly add confectioners sugar.
Increase speed back to high. Mix icing until thickened and there are glossy, stiff peaks.
To add food coloring, separate icing into bowls and add the desired amount of coloring to each bowl, incorporating using a rubber spatula.
While frosting cookies, cover icing you are not using with plastic wrap, as royal icing dries very quickly.
‘Tis the season of holiday get-togethers and family gatherings — even if those are much smaller this year due to the pandemic — and it’s always nice to offer something to nibble on. Bite-size appetizers are a great way to keep costs down and not everything needs to be made from scratch. These easy, inexpensive ideas serve about 10 to 15 people, from meat eaters to vegetarians to vegans. Prices are rough estimates based on Bureau of Labor Statistics data and an informal survey of grocery prices.
Deli ham and cheese get turned into a crowd-pleasing combo with the help of store-bought pizza dough. Roll out the pizza dough ($3) as thin as possible without tearing it and line it with a few thin slices of deli ham and cheese ($2). Roll up the dough with the ham and cheese inside and bake at 450 degrees until bubbly and golden brown. Once cool, slice into bite sized rounds.
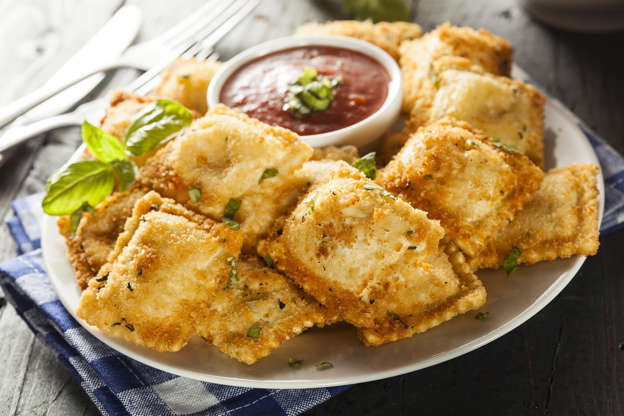
At about 20 cents per piece, frozen ravioli makes a great inexpensive appetizer when fried in oil ($1) until golden brown and served hot. Because they are so rich, figure only one or two ($4 worth) for each guest.
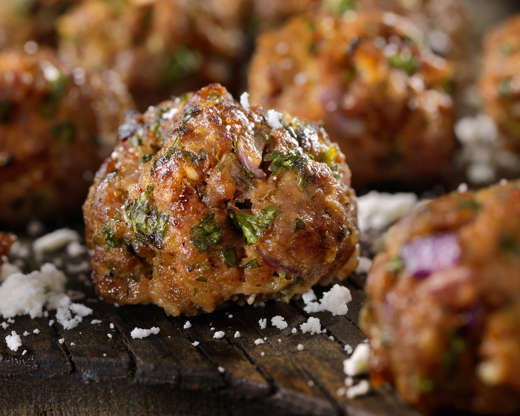
Frozen meatballs cost about $3 a pound and offer large portions. Simply heat them up in the sauce of your choice ($2), such as barbecue or marinara, and serve with toothpicks for a fun and tasty party dish.
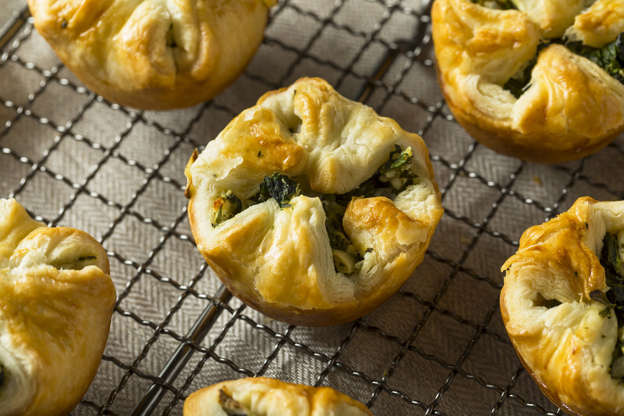
Frozen spinach ($1) and a light sprinkling of feta ($1) in crispy phyllo dough ($3) is a classic flavor combination. To assemble, thaw and season the spinach and combine with feta. Put a spoonful into the phyllo of any shape and bake according to the instructions on the phyllo packet.
Create this favorite using one package of break-and-bake croissant dough ($2) and a package of hot dogs ($3). Cut the hot dogs into bite-size pieces and wrap in a small piece of dough. Bake until the dough puffs up and starts to turn golden.
(OK, there are about 20 more appetizers for you to look at. Just click below and you will magically find the entire 26. So, excuse me while I taste-taste some of these apps.)